How to use a geological map (or where to find an ammonites armour).

When you go fossil hunting, one of the most important things to do is to know what you are looking for. There is no point in looking for a Mammoth skull in a place where the geology is not old enough for Mammoths to be buried there. It’s the same idea as not going fishing in a desert (though geologists sometimes find fish in deserts, but that’s another story). No, in order to know what fossils you expect to find, you need to know about geological maps.

Geological Maps of Britain 1:625 000 Scale BGS

These maps show the bedrock geology – the geology under the soil – for Scotland, Wales, Engand and a bit of Northern Ireland (sorry – overlap is obscuring most of NI)

This is a geological map of Britain. You may realise that it looks a lot like a normal map, except that instead of roads and countryside it has strange bands of colour swirled across it. These bands of colour represent the geology, but I’ll get to that in a minute. First you need to find out where you are on the map.

For argument’s sake I am going to choose Whitby, because I know that is a good place for fossil hunting, but you could start by looking where you live, or somewhere you really want to go looking for fossils (by the way if you don’t have a geology map of your own and can’t find one in your library you can use the digital one on the British Geological Survey website – it’s not as detailed, but you get lots of great extras).

The geology of Whitby

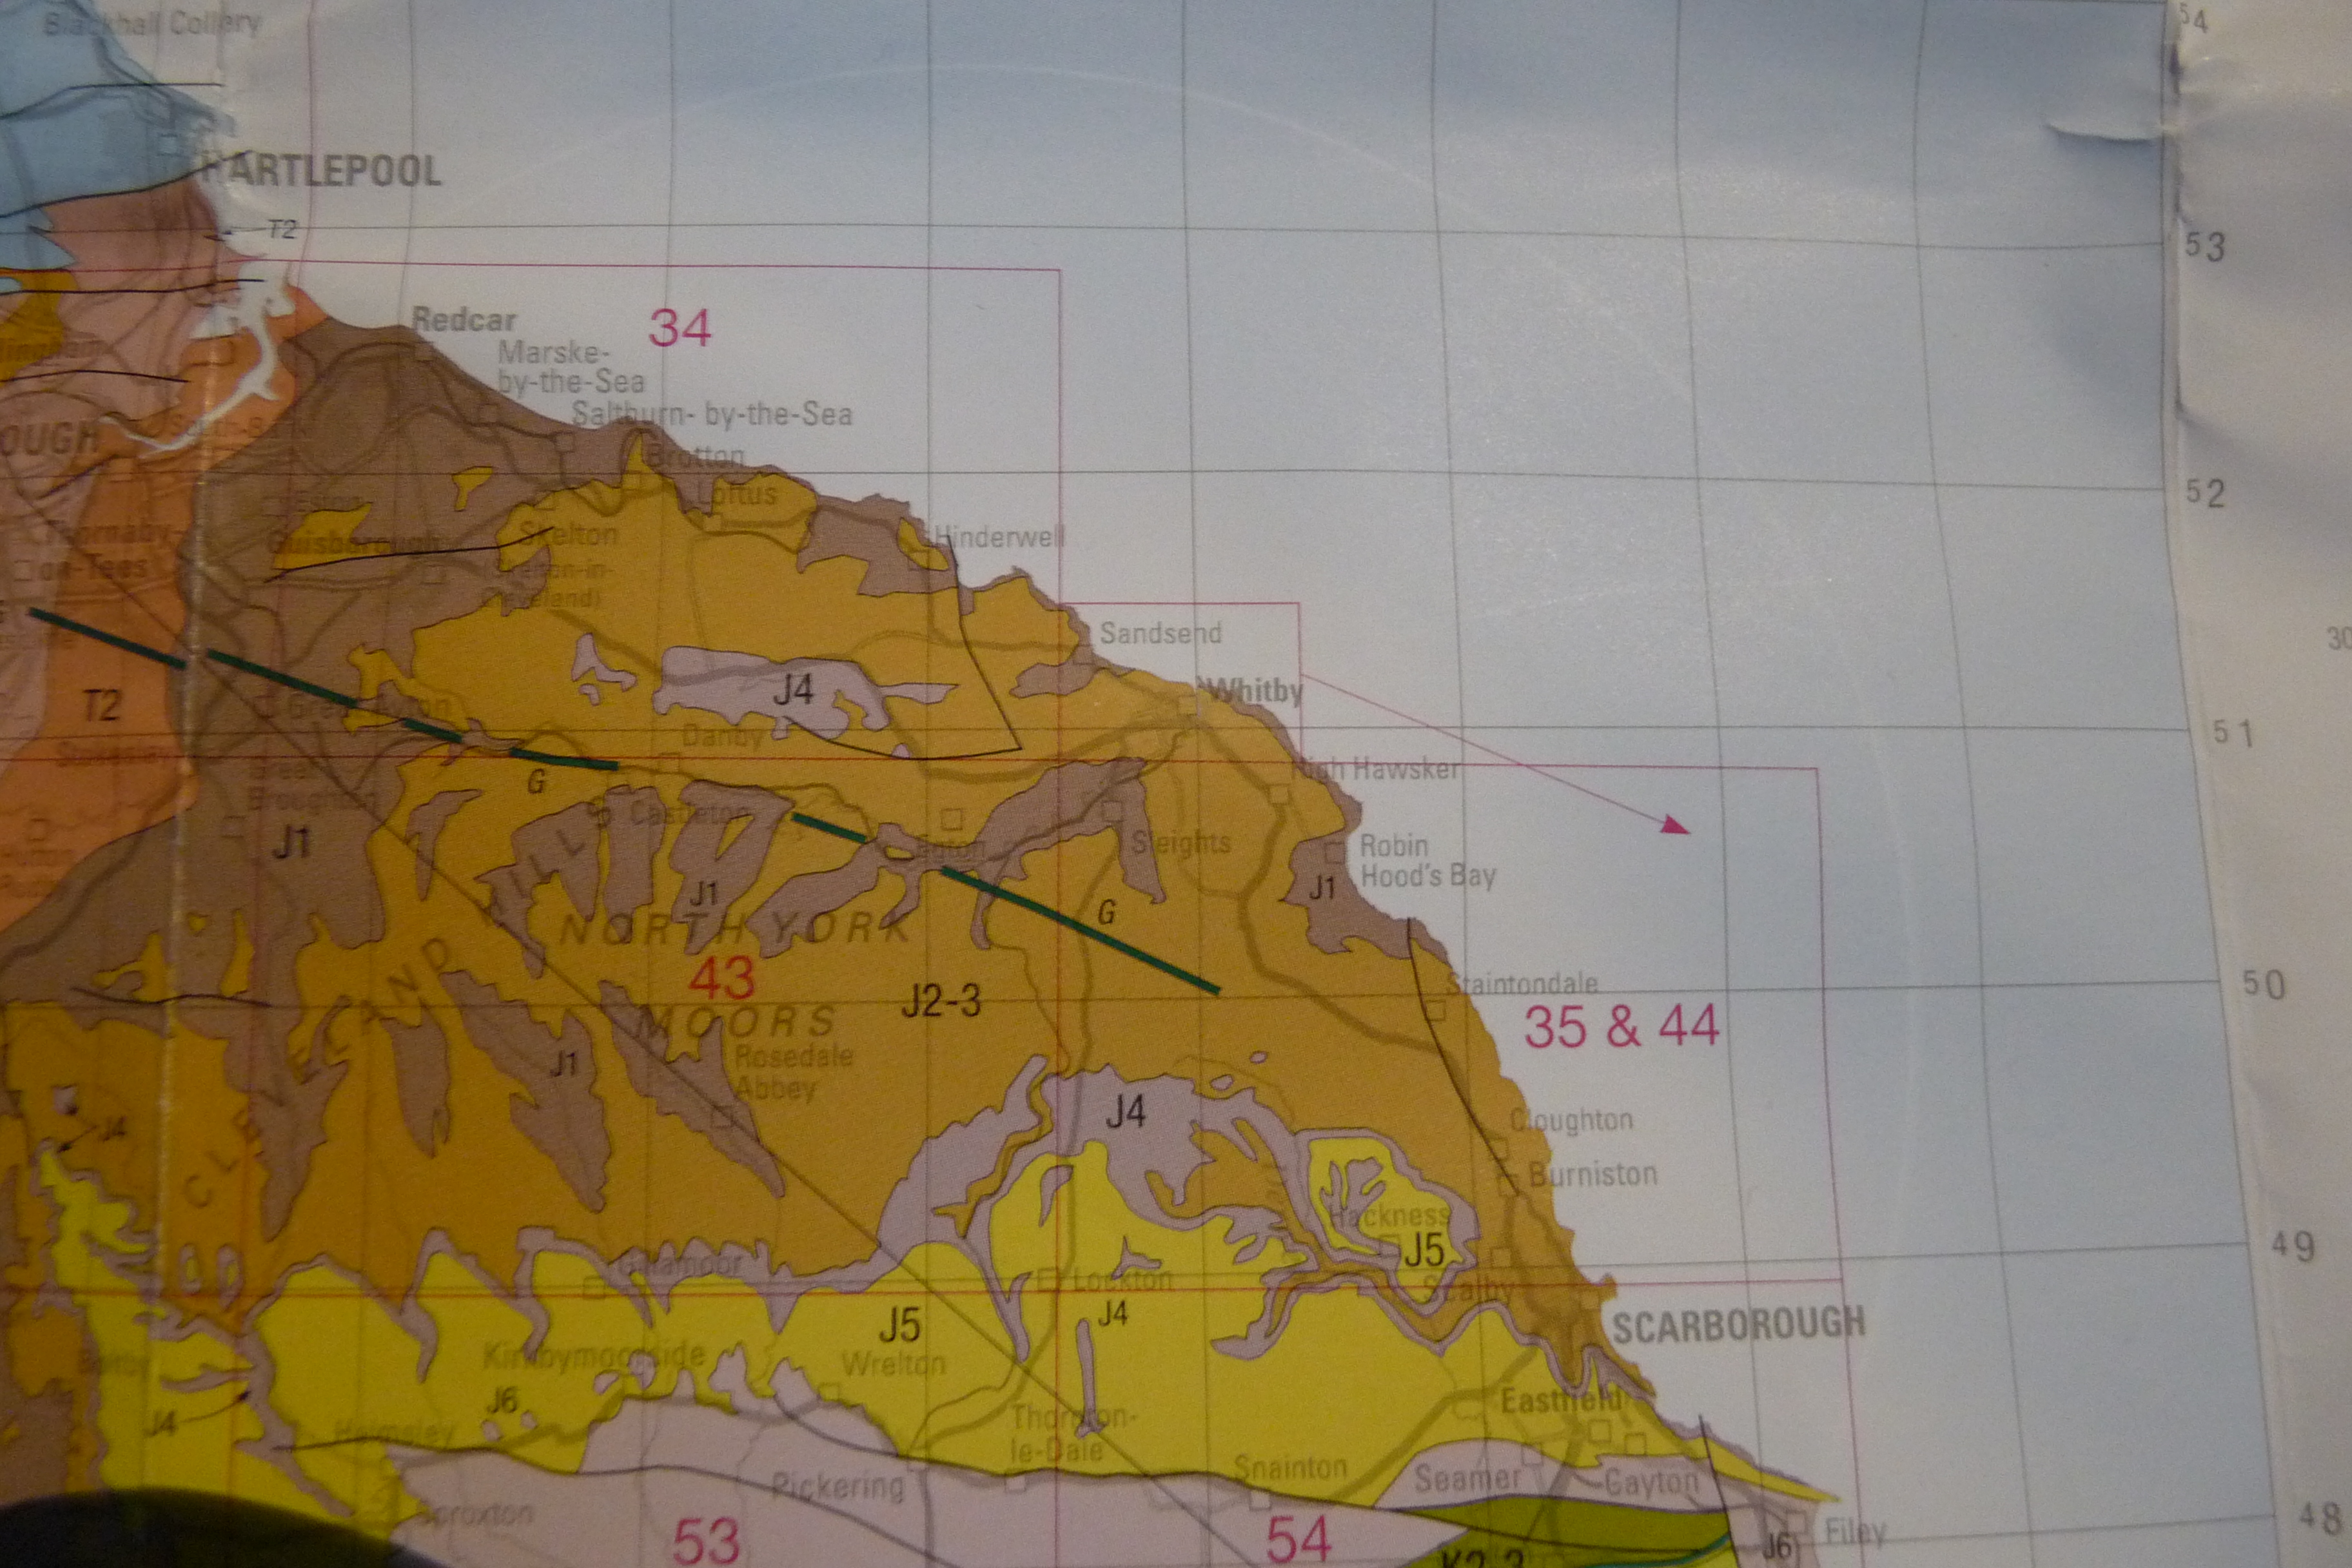
This shows a close up of the geology around Whitby.

So take a closer look at your area. As you can see in this photo the colours on the map around Whitby are:

  • A purpley brown with the letters J1 written in the space
  • An orangey beige with the letters J2-3
  • A light purple with J4
  • A yellow with J5

Which is all well and good, but what does it mean? And how does this help us find our ammonite? Well just to give us context, if we zoom out from Whitby a bit you can see that the nearby area also has greenish bits with ‘K’s on them and pinkish-orange bits with ‘T’s on them.

The geology between Hartlepool and Flamborough Head

This map has zoomed us out a little bit to show some of the other colours in the area.

To find out what this means we need to look at the legend at the side. This is like the key and tells you lots of useful information. Let’s start with what the colours mean.

BGS Bedrock Geology North UK 1:625 000 legend

This is the legend for most of the rocks on this map (there is more but I couldn’t fit it easily on one image)!

Well the first thing that I always notice when I look at the legend of the map is that the colours are all arranged roughly together (there are oranges, blue-greens, beiges, and purples), and that the letters are grouped together as well. So if we think about the ‘J’ letters we were looking at, you can see that they are in the purple-brown section and are linked to an era called Jurassic. This is the geological age of the rocks in this area – it means that all the rocks with a J on them are Jurassic.

This word will probably be familiar to you if you go fossil hunting because here in this country we get a lot of fossils from the Jurassic – including ammonites! So we know we are on the right track. If we look around the Jurassic section, you can see those pinkish-orange colours by the big T are related to the Triassic and the greenish colours above with the K are related to the Cretaceous. Now although you can find fossils in these areas they are a bit far from Whitby, and I think we will find some interesting fossils in the Jurassic age rocks; let’s stick with them.

Zoom in on the legend

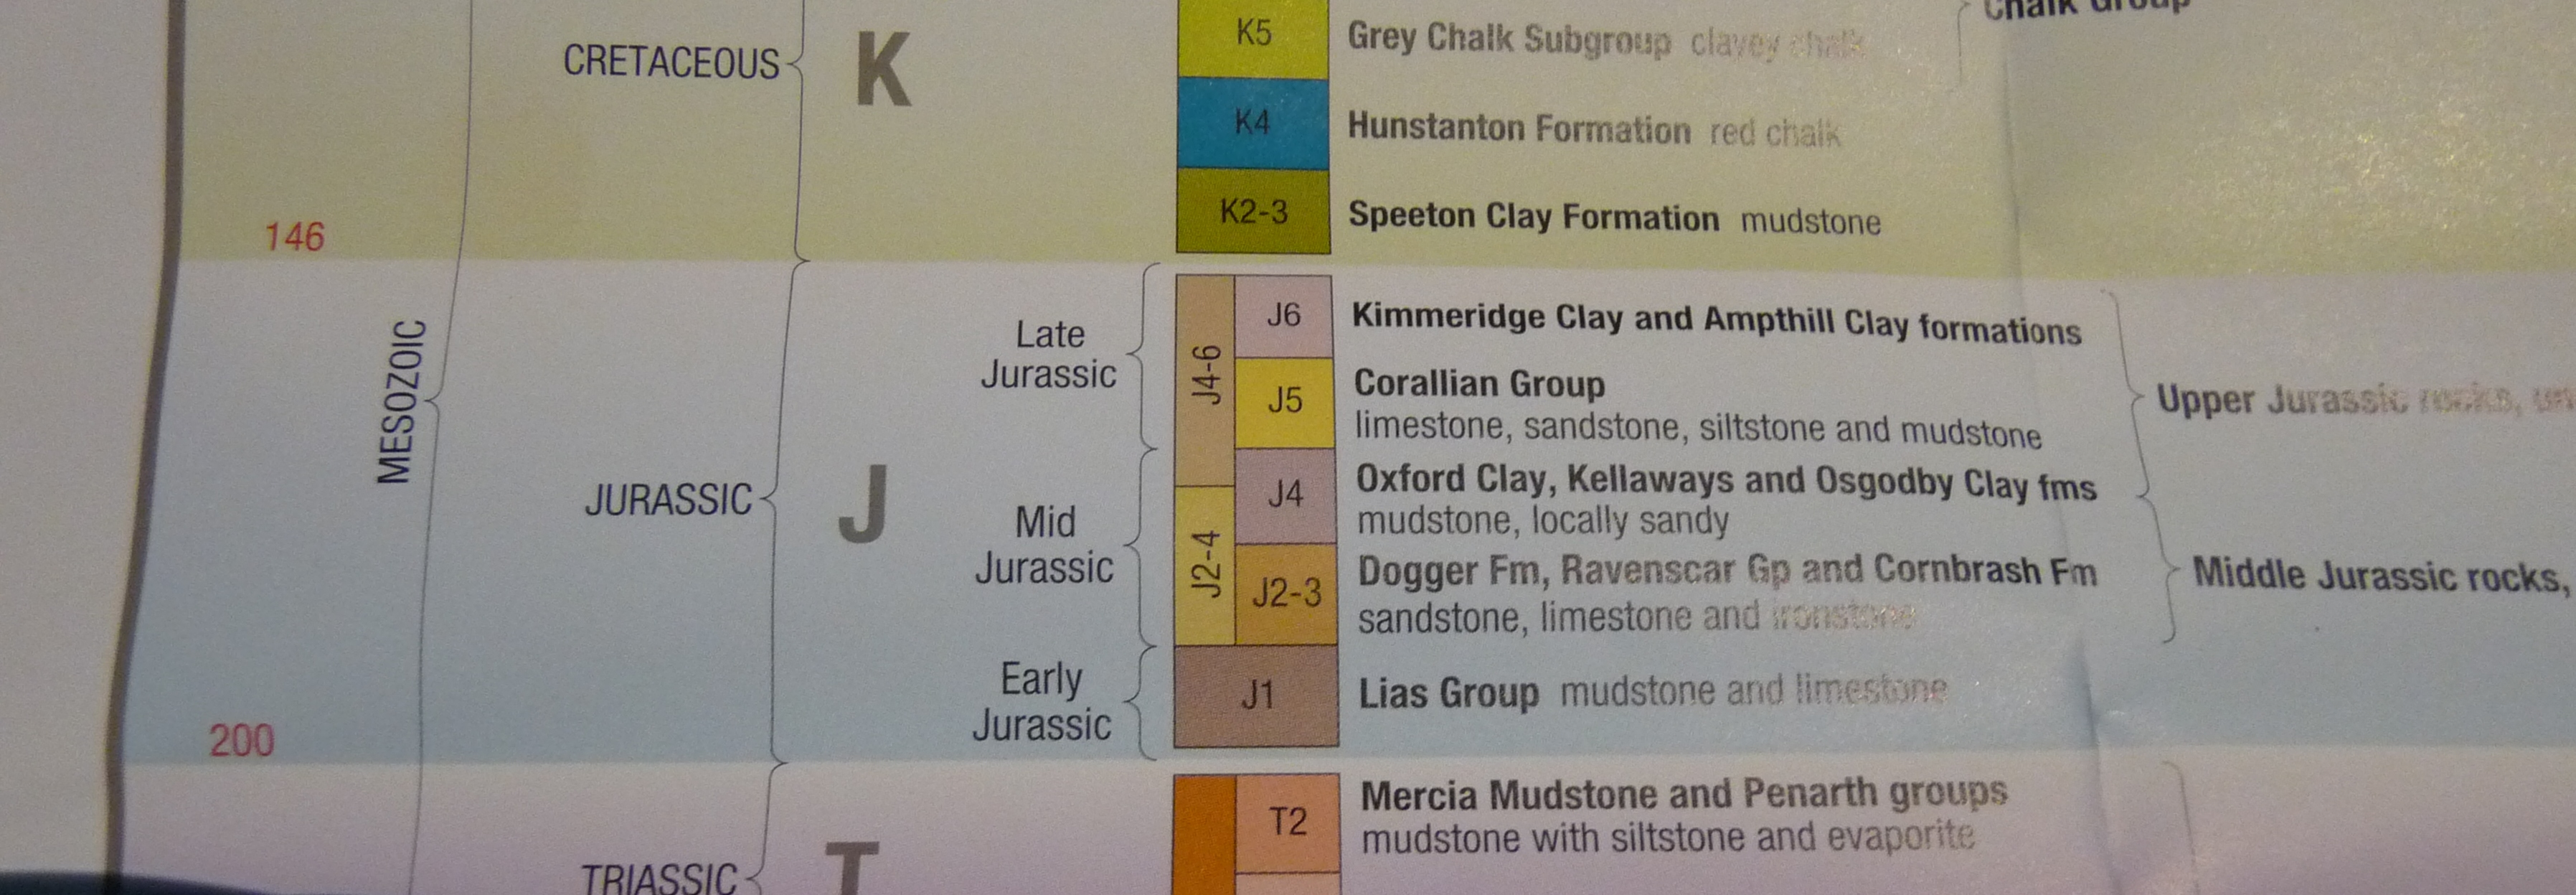
This is close up of the part of the legend that relates to Whitby on the map.

So going back to Whitby, if we want to find some fossils we need to know what kind of rocks to look for. Now to start out at the basic level, we already know we need to find a rock made of sediments (mud, sand, clay etc – the sedimentary rocks) because any rock that has crystals in it (like a granite or a marble) can’t have fossils (those are the igneous and metamorphic rocks). I’ll go into that more later, but first we are thinking about Whitby. So if I look back at my map I can see that the rocks immediately around Whitby are purpley brown with J1 on them. If I read that section of the legend it says:

Early Jurassic {  J1   Lias Group  mudstone and limestone

Ok well the first part (Early Jurassic) is just telling us the age of the rocks. This means these rocks are the oldest in the Jurassic period – if you look to the left a little you can see that the Jurassic started approximately 200 MILLION YEARS AGO!! The second is our letter that led us here. The third is the geologist’s name for these rocks – the Lias Group – it helps geologists to link different rocks together and match them across different parts of the country. The fourth part is the most helpful. Mudstones and limestones.

Shale with bivalves and ammonites

This is a type of mudstone – a shale – with lots of little fossils in it.

This tells us the type of rocks we are looking for – mudstones are stones made of mud (obvious huh?) that are brilliant at preserving fossils and limestones are rocks that are pretty much made of fossils. As a quick guide, mudstones are usually grey (especially in this part of the country) and form lots of layers in rocks. They can look a bit like slate but are very easy to break apart. Limestones can be grey, white or cream coloured depending on the fossils, but fossils in them can be pretty small and sometimes are really broken up, so we are going to focus on the mudstones.

So we know where we want to look – Whitby – what era the rocks will be – Jurassic, specifically Early Jurassic – how old they will be – about 200 million years old (specifically between 201-175 million years old) – and what type of rocks we are looking for – mudstones.

So when we go searching here do we know what kind of fossils to expect to find? AMMONITES! Just like Dactylioceras. This means we probably aren’t going to find a mammoth skull here, the rocks are too old! Same for looking for desert rocks, these rocks are too young for that period of our history. So by looking at a geological map you can know what type of fossils you should expect to find.

Geological maps are useful for lots of other things too, but I just want to go back to those bands of colour we saw on the first image. If you are really interested in finding ammonites, but had already looked in Whitby; a geological map can show us where in the country to find rocks of the same age (Jurassic) or type (Lias Group). You see that big purple swathe across the country down to Dorset? Those rocks are all Jurassic. So in theory you could find ammonites anywhere along that line! But remember only some places are safe to collect in, so check before you go running off to your nearest patch of purple-brown!

One final thing to point out is that if you live in certain places you aren’t going to find any fossils. These are places that have igneous or metamorphic rocks and you can spot them on your map initially by looking for the big red blobs.

Igneous provinces in the Lake District

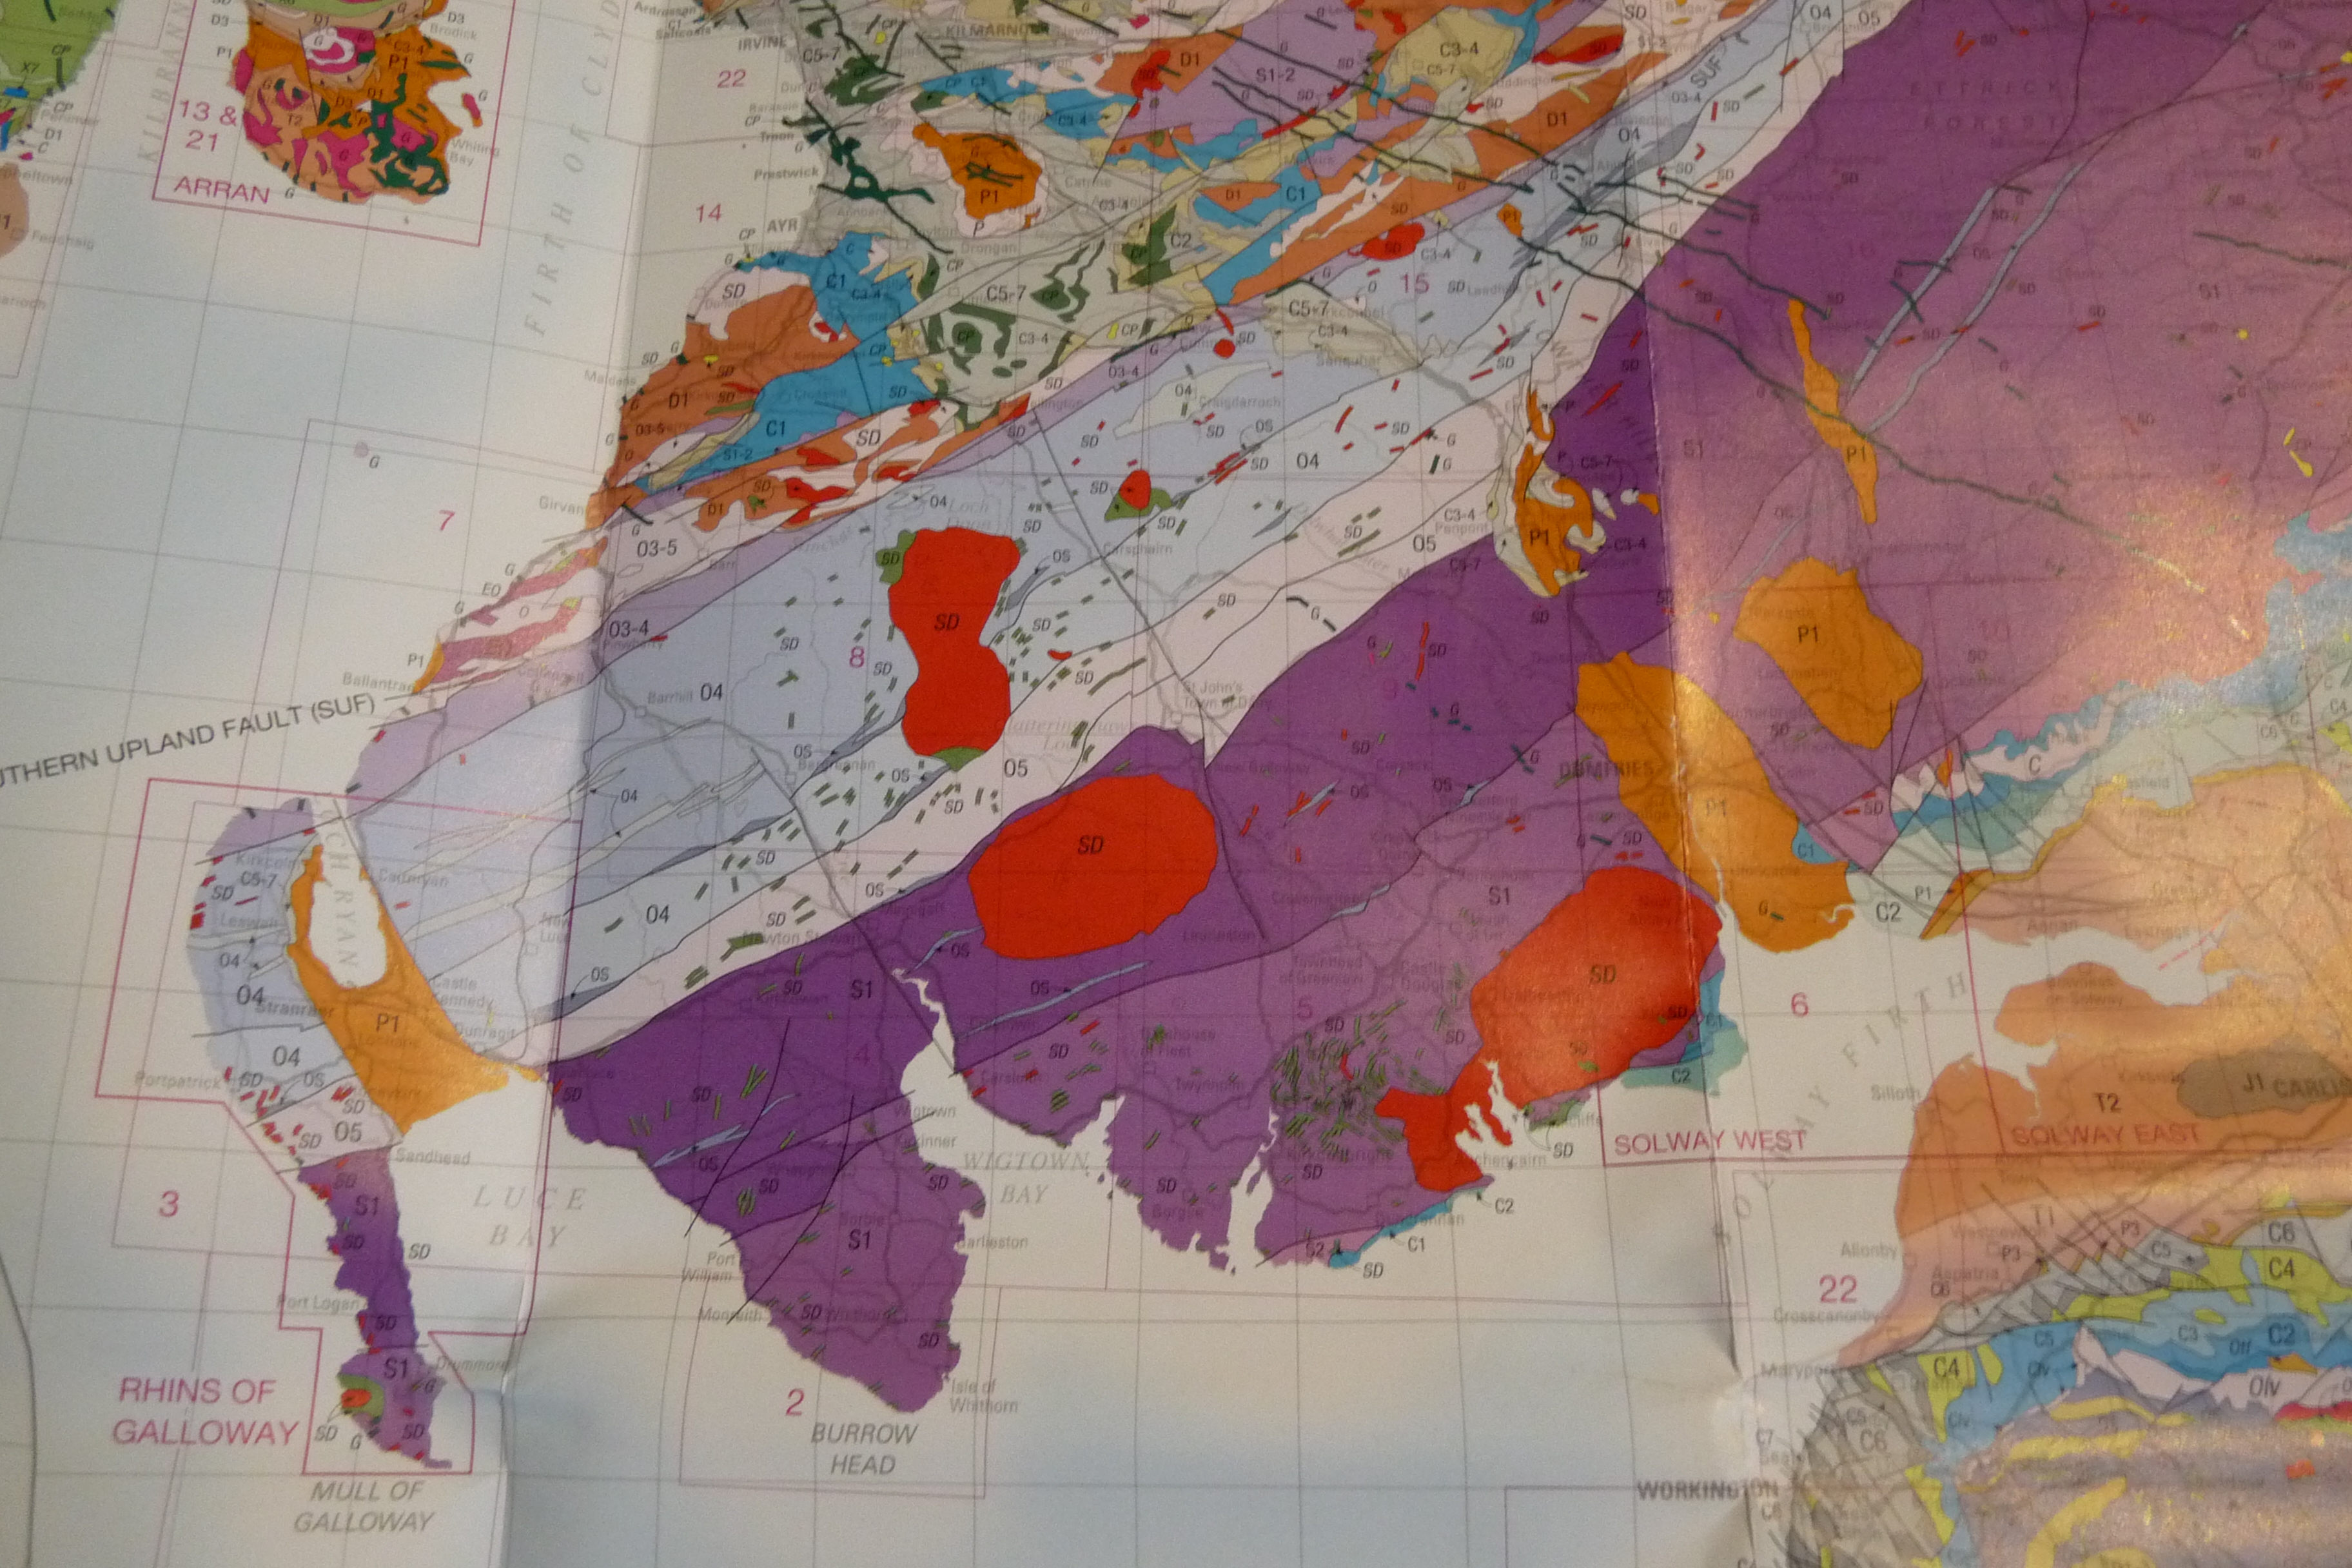
These big red blobs mark where volcanoes used to be and are a sure fire way to find some brilliant rocks and minerals – but no fossils.

Although you are not going to find any fossils in the red blob areas you will find some fantastic volcanic rocks and some amazing and even sometimes really rare minerals and crystals.

If you want to find out more you can check out the British Geological Survey‘s webpage, they have loads of info on the maps they make and even lots of digital ones you can take with you. Check out this pamphlet they produce as well for more in depth information.

BGS - A short Guide to Geological Maps

This pamphlet on geological maps is produced by the BGS.

So there you have it – maps, a geologist’s best friend – and that is how you find an ammonites armour.

Have a rockin’ day!

(this post was moved from my old site, so sorry for any inconsistencies)

So you think you’ve found a fossil

First of all, if you think you have found a fossil then congratulations! You have successfully completed the most important part of being a geologist – getting out there and looking for interesting rocks or fossils. Secondly to make sure that you have found a fossil, we need to make sure we know what a fossil is. The Oxford English Dictionary defines a fossil as:

1: The remains or impression of a prehistoric plant or animal that have been hardened into rock

2: An old or outdated person or thing (ouch!)

So clearly we are more interested in the first part of this than the second. If we follow that line of thought, then fossils are the remains of any living thing that has been in the ground long enough that all, or parts of it, have turned into rock. Now that might seem pretty straightforward, but actually sometimes it can be very difficult to tell if you have the remains of a living thing or not – take a footprint for example, it’s the remains of a living creature, but it’s remarkably easy to see a footprint where actually there is just a depression in the rock.

Are these fossils?

Are these fossils?

And how do you know that something is even a rock?! It sounds strange, but it can even be tricky to work out if something has been buried long enough to be a fossil!

So here are some basic guidelines:

1. You know you have a rock when you can’t easily wash the dirt off – there may be dirt on top of rock, but if when you have given it a bit of a wash all you have left is just a handful of mud then sorry it’s not been down there long enough.

2. You know you have a rock when all the cavities are filled with either rock or crystal material – take a bone or a shell – if you can see lots of spaces where there is no material filling the gaps, it’s probably not a rock.

This is a bone that someone thought was a fossil....

This is a bone that someone thought was a fossil….

But when you look close up, you can see that the holes are not filled with anything - so this bone is not old enough to be a fossil.

But when you look close up, you can see that the holes are not filled with anything – so this bone is not old enough to be a fossil.

3. Now knowing you have a fossil is trickier – sometimes it’s just a matter of getting your eye in – but usually look for a regular pattern – that is dead giveaway.

Some patterns are easier to spot than others

Some patterns are easier to spot than others

Even if you don't know what it is, spotting a pattern is a good first step.

Even if you don’t know what it is, spotting a pattern is a good first step.

Cn you see the fossil in this one? It's an ammonite - look for the curling shape with lines.

Can you see the fossil in this one? It’s an ammonite – look for the curling shape with lines.

Some things look so strange you might think they are fakes - the stars in this are tthe fossilised stalk of an ancient sea creature!

Some things look so strange you might think they are fakes – the stars in this rock are the fossilised stalks of an ancient sea creature!

Some fossils are small or have been fossilised in an unsual way - some of these are on their sides!

Some fossils are small or have been fossilised in an unusual way – some of these are on their sides!

4. Most often the most useful thing you can do is look at what kind of fossils are usually found in your area – let’s face it, you’re very unlikely to find a t-rex skull in a garden in Greenwich, but if you know what fossils you should be finding you can work out if yours is more likely to be a fossil.

If you have managed to find a real fossil (well done!) then you have to work out what kind of fossil you have, and to do that you need to look at a geological map, which I’ll talk about next time.

Have a rockin’ day!

P.S. To help you with your own fossil discoveries, here a useful book you can look at:

Dorling Kindersley’s ‘Fossils’ book, last re-printed in 2010 (the link I have included is to Amazon so you can take a look at it, but I would recommend you check it out in your local library first, especially if you are just starting out).

Other good webpages to look at include:

The Natural History Museum

The Geological Society

(this post was moved from my old site, so sorry for any inconsistencies)

Staying safe while on fieldwork.

So new year, new blog, but as fun as geology is – and I hope you agree with me, looking at and for rocks and fossils is great fun! – the first post always has to be about safety. May be a little boring, but if you want to be a rock or fossil hound then the first thing you have to consider is looking after yourself.

Can’t get much more protected than that!

Can’t get much more protected than that!

The main reason for this is that most types of geology are done outside (gasp) near rock faces, cliffs and other unstable lumps of stuff that could fall and hit you on the head. So in order to get this section out of the way quickly and get on to the best bits here is a quick guide to staying safe in the field.

1. Don’t go alone!

The first and most important thing to do when you are going out on ANY geo-related trip is; if at all possible don’t go by yourself. At the very least make sure you have some way of contacting someone if you MUST go by yourself.

‘Hello, Sally? No, everything is fine – I’ve just found some awesome fossilized ripples!!’

‘Hello, Sally? No, everything is fine – I’ve just found some awesome fossilized ripples!!’

On a similar theme, tell someone where you are going and when you expect to be back. I know it seems elementary, but having someone say ‘Hey wasn’t Joe supposed to be back with that Ichthyosaur head by now?’ when you are stranded on a beach with the tide coming in is a very useful thing indeed.

2. Wear proper clothes.

Again this sounds silly, but you would be surprised by how many people go on fieldtrips badly dressed – even university geology students. High heels are a no. As are any clothes that are difficult to walk in, restrictive or delicate (fancy floaty shirts and mud are never going to be great friends). I also want to make a point here about jeans. Jeans are terrible fieldwork trousers – not only do they get wet easily (and when they are wet they stay wet and get really HEAVY), but they also shrink when they get wet too. Not great for the end of the day – even less great if you have an accident. Cotton based trousers are best and if you’re cold – layer!

Ah my lovely walking boots – make sure they are done up tight around your ankle – it may feel uncomfortable at first, but it will save you lots of hurt later!

Ah my lovely walking boots – make sure they are done up tight around your ankle – it may feel uncomfortable at first, but it will save you lots of hurt later!

The best shoes are walking boots that support your ankle – it’s amazing how you don’t ever twist your ankle in a pair of well done up walking boots! – but you can judge what is appropriate by where you are going. If you are out in Britain – take a raincoat!! Come on, we may want to imagine we live in the south of France, but there is a very strong chance it will rain most of the time you want to go out (ditto for waterproof trousers). Though sunscreen and a hat in summer are also a good idea.

 3. Stay away from the cliff face.

If you are searching on a beach this can be very tempting, but unless you have a hard hat cliffs are a very bad idea. In 2012 alone the number of landslides along the south coast have been huge (and in at least one instance, fatal) and if you haven’t ever seen a rock fall or landslide – they can move fast! Faster than you would notice them and run away – so unless you are with a professional, stay away from the cliff. If you don’t believe me, look at this video from WDEF News and see what I mean.

Safety signs point out dangerous cliff faces (also look out for cliffs covered by plants)

Safety signs point out dangerous cliff faces (also look out for cliffs covered by plants).

If in doubt wear a hard hat.

If in doubt wear a hard hat.

4. Only go where you are allowed.

This kinda leads on from the last one really – an old quarry can be a brilliant place to find great rocks and minerals – but only if you are allowed to go in. Some quarries are public access and considered mostly safe, some allow visitors if they are with a professional, but always check. If there is barbed wire, angry looking signs in red or yellow, or dogs – stay clear! This also applies to private property – check you are allowed to collect before going rummaging around on someone’s farm or garden.

Nice public access quarry.....

Nice public access quarry…..

..... less nice private land.

….. less nice private land.

5. Check the weather!

I may have joked about it earlier, but bad weather can really ruin your day – and even put you in danger. We aren’t always going to have lovely balmy days when we go collecting, but equally going fossil hunting in a force 10 gale, when it is snowing, and there is hail the size of your fist, isn’t a brilliant plan. Settle back into your sofa, dig out your favourite fossil book and go tomorrow. The good thing about geology? It’ll still be there the next day!

Who knew even clouds could be geological?!

Who knew even clouds could be geological?!

Of course there are lots of other things you can do to keep yourself out of danger – and I suggest you do them, but for me, these five are the most important. So remember stay safe and if you don’t feel comfortable don’t do it – even people that should know better sometimes do stupid things!

Yeah that isn’t such a great idea.

Yeah that isn’t such a great idea.

If in doubt follow The Geologist’s Association Fieldwork Code (part 1 and part 2) – it also includes treating places with respect which I’ll go over in another blog, but it is very handy (and detailed!).

Have a rockin’ day!

(this post was moved from my old site, so sorry for any inconsistencies)